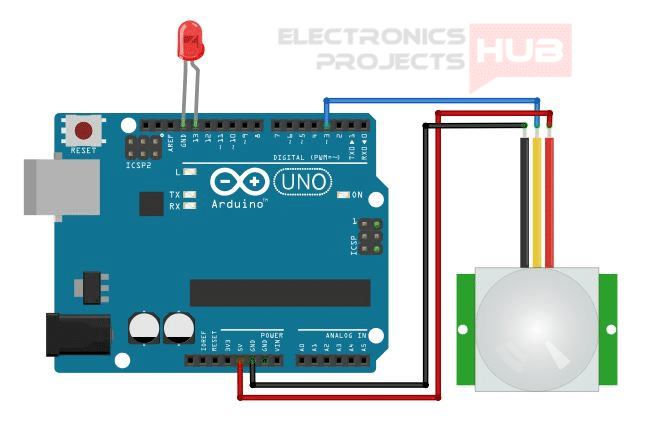
In this article, you will see how PIR sensor works and how to connect and use it with Arduino. No more worries, now you can connect and use PIR sensor with Arduino step by step.
Contents
PIR sensor Working
PIR is known as passive infrared. Where it detects heat from moving objects. Usually the PIR sensor module consists of Fresnels lens, which directs the IR rays on to the sensor. We can adjust the sensitivity and delay of the sensor. For complete information about the modes and working of the sensor, watch the video below.
Arduino PIR sensor Connections

Interfacing PIR sensor with Arduino
Arduino Code for PIR sensor
int led = 13;                // the pin that the LED is attached to
int sensor = 3;              // the pin that the sensor is attached to
int state = LOW;             // by default, no motion detected
int val = 0;                 // variable to store the sensor status (value)

void setup() {
  pinMode(led, OUTPUT);      // initialize LED as an output
  pinMode(sensor, INPUT);    // initialize sensor as an input
  Serial.begin(9600);        // initialize serial
}

void loop(){
  val = digitalRead(sensor);   // read sensor value
  if (val == HIGH) {           // check if the sensor is HIGH
    digitalWrite(led, HIGH);   // turn LED ON
    delay(100);                // delay 100 milliseconds

    if (state == LOW) {
      Serial.println("Motion detected!");
      state = HIGH;       // update variable state to HIGH
    }
  }
  else {
      digitalWrite(led, LOW); // turn LED OFF
      delay(200);             // delay 200 milliseconds

      if (state == HIGH){
        Serial.println("Motion stopped!");
        state = LOW;       // update variable state to LOW
    }
  }
}
Download PIR Arduino Code
If you have any queries feel free to connect us on social handles Facebook