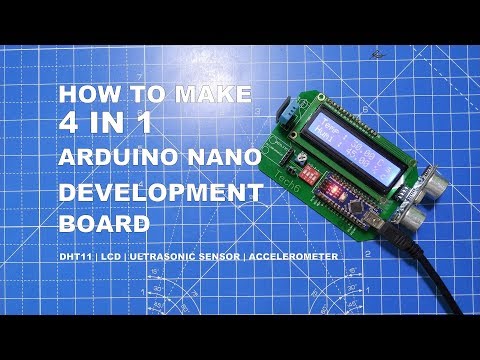
In this article, you will learn how to make an Arduino Nano development board. The Arduino nano developement board is having an on-board slots for ultrasonic sensor (HCSR-04), Accelerometer, DHT11 sensor and Liquid Crystal Display (LCD).
Contents
This board having the 4- DIP switch, which is used to change the mode of the development board.
- Turning ON first switch displays the Text on LCD.
- Turning ON second switch displays the data from Accelerometer on LCD.
- Turning ON third switch displays the Temperature and Humidity data form DHT11 sensor on LCD.
- Turning ON fourth switch displays the Distance of Obstacle from Ultrasonic sensor on LCD.
Components Required
- PCB ( you can download from the link below).
- Female Header pins.
- 10K Ohm potentiometer.
- 4 switches DIP switch.
How to Make Arduino Nano Developement Board
Step by step prodecure
- Place all small components on the PCB and solder them.

2.Place female header pins in their respective positions.

3. Solder all pins.

4. Insert all components in their respective slots.

5. Upload the code to Arduino Nano.

Arduino Code
#include "dht.h"
#define dht_apin A4
dht DHT;
#include <LiquidCrystal.h>
const int rs = 12, en = 11, d4 = 5, d5 = 4, d6 = 3, d7 = 2;
LiquidCrystal lcd(rs, en, d4, d5, d6, d7);
byte heart[8] = {
  0b00000,
  0b01010,
  0b11111,
  0b11111,
  0b11111,
  0b01110,
  0b00100,
  0b00000
};
byte smiley[8] = {
  0b00000,
  0b00000,
  0b01010,
  0b00000,
  0b00000,
  0b10001,
  0b01110,
  0b00000
};
byte frownie[8] = {
  0b00000,
  0b00000,
  0b01010,
  0b00000,
  0b00000,
  0b00000,
  0b01110,
  0b10001
};
byte armsDown[8] = {
  0b00100,
  0b01010,
  0b00100,
  0b00100,
  0b01110,
  0b10101,
  0b00100,
  0b01010
};
byte armsUp[8] = {
  0b00100,
  0b01010,
  0b00100,
  0b10101,
  0b01110,
  0b00100,
  0b00100,
  0b01010
};
const int trigPin = 10;
const int echoPin = 9;
long duration;
int distanceCm, distanceInch;
int a = 0;
int b = 0;
int c = 0;
int d = 0;
int c0 , c1 , c2 , c3 , c4;
int x = A2;
int y = A1;
int z = A0;
void setup() {
  lcd.begin(16, 2);
  lcd.createChar(c0, heart);
  lcd.createChar(c1, smiley);
  lcd.createChar(c2, frownie);
  lcd.createChar(c3, armsDown);
  lcd.createChar(c4, armsUp);
  pinMode(trigPin, OUTPUT);
  pinMode(echoPin, INPUT);
  pinMode(6, INPUT);
  pinMode(7, INPUT);
  pinMode(8, INPUT);
  pinMode(13, INPUT);
  Serial.begin(9600);
}
void loop() {
  a = digitalRead(6);
  b = digitalRead(7);
  c = digitalRead(8);
  d = digitalRead(13);
  if (a == HIGH)
  {

    digitalWrite(trigPin, LOW);
    delayMicroseconds(2);
    digitalWrite(trigPin, HIGH);
    delayMicroseconds(10);
    digitalWrite(trigPin, LOW);
    duration = pulseIn(echoPin, HIGH);
    distanceCm = duration * 0.034 / 2;
    distanceInch = duration * 0.0133 / 2;
    lcd.setCursor(0, 0);
    lcd.print("Distance: ");
    lcd.print(distanceCm);
    lcd.print(" Cms");
    Serial.print("Distance: ");
    Serial.print(distanceCm);
    Serial.println(" Cms");
    delay(100);
    lcd.setCursor(0, 1);
    lcd.print("Distance: ");
    lcd.print(distanceInch);
    lcd.print(" inch");
    Serial.print("Distance: ");
    Serial.print(distanceInch);
    Serial.println(" inch");
    delay(100);
  }
  else if (b == HIGH)
  {

    DHT.read11(dht_apin);
    lcd.setCursor(0, 0);
    lcd.print("Temp : ");
    lcd.print(DHT.temperature);
    lcd.print(" C ");
    Serial.print("Temp : ");
    Serial.print(DHT.temperature);
    Serial.println(" C ");
    delay(100);
    lcd.setCursor(0, 1);
    lcd.print("Humi : ");
    lcd.print(DHT.humidity);
    lcd.print(" % ");
    Serial.print("Humi : ");
    Serial.print(DHT.humidity);
    Serial.println(" % ");
    delay(100);
  }
  else if (c == HIGH)
  {

    lcd.setCursor(0, 0);
    lcd.print(" Accelerometer");
    Serial.print(" Accelerometer --------  ");
    lcd.setCursor(0, 1);
    lcd.print("X:");
    lcd.print(analogRead(x));
    Serial.print("X:");
    Serial.print(analogRead(x));
    lcd.setCursor(5, 1);
    lcd.print("Y:");
    lcd.print(analogRead(y));
    Serial.print("Y:");
    Serial.print(analogRead(y));
    lcd.setCursor(11, 1);
    lcd.print("Z:");
    lcd.print(analogRead(z));
    Serial.print("Z:");
    Serial.println(analogRead(z));
    delay(10);
  }
  else if (d == HIGH)
  {

    //}
    //else
    //{

    lcd.setCursor(0, 0);
    lcd.print("   Tech Maker   ");
    Serial.println(" Tech Maker ");
    delay(100);
    lcd.setCursor(1, 1);
    lcd.write(c0);
    lcd.setCursor(4, 1);
    lcd.write(c1);
    lcd.setCursor(7, 1);
    lcd.write(c2);
    lcd.setCursor(10, 1);
    lcd.write(c3);
    lcd.setCursor(14, 1);
    lcd.write(c4);
    delay(100);
  }
  else
  {
    Serial.println("---------------- NO ----------------");
    delay(100);
    lcd.clear();
  }
}Download Files
If you have any queries feel free to connect us on social handles Facebook