In this article, you will learn how to set up and interface the BMP180 sensor with Arduino. BMP180 is one of the sensor of BMP XXX series. They are all designed to measure Barometric Pressure or Atmospheric pressure. BMP180 is a high precision sensor designed for consumer applications. Barometric Pressure is nothing but weight of air applied on everything. The air has weight and wherever there is air its pressure is felt. BMP180 sensor senses that pressure and provides that information in digital output. Also the temperature affects the pressure and so we need temperature compensated pressure reading. To compensate, the BM180 also has good temperature sensor.
Contents
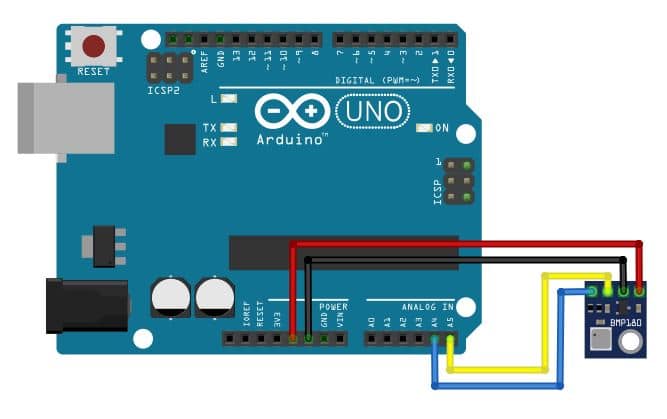
BMP180 Arduino Connections
Like most pressure sensors, the BMP180 measures absolute pressure. This is the actual ambient pressure seen by the device, which will vary with both altitude and weather.
Before taking a pressure reading you must take a temperature reading.This is done with startTemperature() and getTemperature(). The result is in degrees C.
Once you have a temperature reading, you can take a pressure reading. This is done with startPressure() and getPressure(). The result is in millibar (mb) aka hectopascals (hPa).
If you’ll be monitoring weather patterns, you will probably want to remove the effects of altitude. This will produce readings that can be compared to the published pressure readings from other locations. To do this, use the sealevel() function. You will need to providethe known altitude at which the pressure was measured.
If you want to measure altitude, you will need to know the pressure at a baseline altitude. This can be average sealevel pressure, or a previous pressure reading at your altitude, in which case subsequent altitude readings will be + or – the initial baseline. This is done with the altitude() function.
Hardware connections:
- (GND) to GND
- (VDD) to 3.3V
You will also need to connect the I2C pins (SCL and SDA) to your Arduino. The pins are different on different Arduinos:
Any Arduino pins labeled: SDA SCL
Uno, Redboard, Pro: A4 A5
Mega2560, Due: 20 21
Leonardo: 2 3
Leave the IO (VDDIO) pin unconnected. This pin is for connecting the BMP180 to systems with lower logic levels such as 1.8V
BMP180 Sensor Arduino Tutorial
BMP180 Sensor Arduino Code
#include <SFE_BMP180.h>
#include <Wire.h>

// You will need to create an SFE_BMP180 object, here called "pressure":

SFE_BMP180 pressure;

#define ALTITUDE 66.0 // Altitude of SparkFun's HQ in Boulder, CO. in meters

void setup()
{
  Serial.begin(9600);
  Serial.println("REBOOT");

  // Initialize the sensor (it is important to get calibration values stored on the device).

  if (pressure.begin())
    Serial.println("BMP180 init success");
  else
  {
    // Oops, something went wrong, this is usually a connection problem,
    // see the comments at the top of this sketch for the proper connections.

    Serial.println("BMP180 init fail\n\n");
    while(1); // Pause forever.
  }
}

void loop()
{
  char status;
  double T,P,p0,a;

  // Loop here getting pressure readings every 10 seconds.

  // If you want sea-level-compensated pressure, as used in weather reports,
  // you will need to know the altitude at which your measurements are taken.
  // We're using a constant called ALTITUDE in this sketch:

  Serial.println();
  Serial.print("provided altitude: ");
  Serial.print(ALTITUDE,0);
  Serial.print(" meters, ");
  Serial.print(ALTITUDE*3.28084,0);
  Serial.println(" feet");

  // If you want to measure altitude, and not pressure, you will instead need
  // to provide a known baseline pressure. This is shown at the end of the sketch.

  // You must first get a temperature measurement to perform a pressure reading.

  // Start a temperature measurement:
  // If request is successful, the number of ms to wait is returned.
  // If request is unsuccessful, 0 is returned.

  status = pressure.startTemperature();
  if (status != 0)
  {
    // Wait for the measurement to complete:
    delay(status);

    // Retrieve the completed temperature measurement:
    // Note that the measurement is stored in the variable T.
    // Function returns 1 if successful, 0 if failure.

    status = pressure.getTemperature(T);
    if (status != 0)
    {
      // Print out the measurement:
      Serial.print("temperature: ");
      Serial.print(T,2);
      Serial.print(" deg C, ");
      Serial.print((9.0/5.0)*T+32.0,2);
      Serial.println(" deg F");

      // Start a pressure measurement:
      // The parameter is the oversampling setting, from 0 to 3 (highest res, longest wait).
      // If request is successful, the number of ms to wait is returned.
      // If request is unsuccessful, 0 is returned.

      status = pressure.startPressure(3);
      if (status != 0)
      {
        // Wait for the measurement to complete:
        delay(status);

        // Retrieve the completed pressure measurement:
        // Note that the measurement is stored in the variable P.
        // Note also that the function requires the previous temperature measurement (T).
        // (If temperature is stable, you can do one temperature measurement for a number of
        // pressure measurements.)
        // Function returns 1 if successful, 0 if failure.

        status = pressure.getPressure(P,T);
        if (status != 0)
        {
          // Print out the measurement:
          Serial.print("absolute pressure: ");
          Serial.print(P,2);
          Serial.print(" mb, ");
          Serial.print(P*0.0295333727,2);
          Serial.println(" inHg");

          // The pressure sensor returns abolute pressure, which varies with altitude.
          // To remove the effects of altitude, use the sealevel function and your current
          // altitude.
          // This number is commonly used in weather reports.
          // Parameters: P = absolute pressure in mb, ALTITUDE = current altitude in m.
          // Result: p0 = sea-level compensated pressure in mb

          p0 = pressure.sealevel(P,ALTITUDE); // we're at 1655 meters (Boulder, CO)
          Serial.print("relative (sea-level) pressure: ");
          Serial.print(p0,2);
          Serial.print(" mb, ");
          Serial.print(p0*0.0295333727,2);
          Serial.println(" inHg");

          // On the other hand, if you want to determine your altitude from the pressure reading,
          // use the altitude function along with a baseline pressure (sea-level or other).
          // Parameters: P = absolute pressure in mb, p0 = baseline pressure in mb.
          // Result: a = altitude in m.

          a = pressure.altitude(P,p0);
          Serial.print("computed altitude: ");
          Serial.print(a,0);
          Serial.print(" meters, ");
          Serial.print(a*3.28084,0);
          Serial.println(" feet");
        }
        else Serial.println("error retrieving pressure measurement\n");
      }
      else Serial.println("error starting pressure measurement\n");
    }
    else Serial.println("error retrieving temperature measurement\n");
  }
  else Serial.println("error starting temperature measurement\n");

  delay(5000);  // Pause for 5 seconds.
}Download BMP180 Sensor Library
If you have any queries feel free to connect us on social handles Facebook